Tuesday, September 16, 2014

Bubba Keg Painting

*Please Note: This post has been imported from my previous blog, Organized Magnolia*


Ah summer time. Makes me love being out by the pool, beach, lake, and the river. In Georgia, you have easy access to all of them. One of my favorite things for summer are bubba kegs. When everyone thinks of a bubba keg, they unfortunately think of an alcohol storage cup. Don't be fooled! This thing is amazing for all kind of drinks that need to be kept cool. I use it for water a lot of the time! If cleaned and cared for correctly, they can last a long time. Unfortunately, they don't always come in the best colors. So here is how I made mine look so cute!


I implemented the method I wrote about here. That includes the spray paint, ModPodge, and MinWax.


My method is awesome. I applied multiple thin coats of the MinWax and it has held together so well!


My friends have even declared that I have to paint them one for their Birthdays. Oh well. I guess the demands will never end.


Happy Crafting!


Image Map

Tuesday, August 26, 2014

How to Paint and Seal a Cooler

*Please Note: This post has been imported from my previous blog, Organized Magnolia*

Back in college, all of the sorority girls would paint their formal dates a cooler. Its a really great idea, if you A) really know the guy or B) like to paint and craft. A lot of girls actually hated painting the coolers because it took so much time and effort for something that was probably going to chip off in a day. I, however, have figured out the way to make paint stick to coolers. It takes some commitment and a couple of days. BUT it sticks! 


I have painted three coolers with this method and every single one has the paint still on it with little to no chips. Here are a couple of images from the coolers I did before:


So after seeing all of this, my mom decided I get to make my grandfather's birthday present this year. Mind you, his birthday was in the middle of February, but since this will be intended for football season, I don't think he will mind waiting. 

My list of supplies:
Modpodge
Polyurethren (MinWax)
Acrylic Paint
White Spray Paint
Brushes
Painter's Tape
Sharpies
Paint Pens

The first step is to take off any labels that are on the cooler. Then, use the painter's tape and tape off any spots you don't want to be covered with spray paint. Here is my grandfather's cooler with the handles and wheels covered. I didn't want to hassle with try to paint those areas. 


Next, I spray it with the spray paint. Make sure it is completely white. I don't want to be able to see any color (in my case navy) peeking out. This is kind of like priming your wall when there is a darker color underneath it. It makes a HUGE difference.


After you let that dry, its time to paint! Depending on how detailed you want it to be and what you are doing to it, this can take a couple of days. First start with sketching what you want with a pencil. Don't use a mechanical pencil because they don't work well with shading or light traces. And they can pick off the white paint. If you can't draw very well, you can always try a tracing method. KariAnne from Thistlewood Farms has a wonderful tutorial on how she traced a monogram onto fabric. You can use the same method for tracing onto a cooler. (Find it here) Here are some work in progress images:


*My grandfather is an alumna of the University of Mississippi*

A really nice tip that I have picked up is using sharpies for outlining and paint pens for writing. Sharpie has actually just come out with a paint pen! I really like it. It doesn't clot like normal paint pens do. I was able to outline the below fairly quickly and easily.


After you are done with the painting, put a layer of Modpodge on it. I buy the shiny modpodge because I like the way it looks. Lots of people prefer the matte version though. I normally put a couple of layers on because it makes me feel better, but you should be okay with just one or two.


Then, I put a layer of Min Wax on it. Make sure to coat it really well with this layer, but not too much because it has a yellow tint to it (aka white becomes cream if its too thick). This is the waterproof seal that makes sure it doesn't flake or peel off EVER. I have made three coolers with this method over two years ago and the boys still say it hasn't chipped. Let this dry for a really long time (about a day). Note: when using Min Wax, the brush can't be cleaned with normal soap and water like acrylic paints. You need to use mineral salts to clean it. Or if you are really lazy like me, buy the cheapest brush at The Home Depot, and throw it away once you are done. Go buy another when you need it. They are like $1. You can freeze the brush in the freezer in between coats!


So after you do that, feel the cooler. Does it feel sticky? If it does, add another layer of Modpodge! If not, its ready! I've been interested in trying this with ModPodge Outdoor. I just discovered it, but didn't have time to try it out. Maybe on my next cooler?

Happy Crafting!


Image Map


You Might Also Be Interested In:
Decorate With Your Graduation Gear by Happiness and Heather
Decorate With Your Graduation Gear
Kate Spade-Esk Champagne Sign by Happiness and Heather
Kate Spade-Esk Champagne Sign
Basics of DIY Blog Designing By Happiness and Heather
Basics of DIY Blog Designing
Bubba Keg Painting by Happiness and Heather
Bubba Keg Painting

Thursday, July 10, 2014

Update on Dining Room Decorations

Remember a while back when I was coming up with ideas on how to decorate my new apartment (See here)? Well, unfortunately, I had NO idea on what to do with my dining room at that time. All I knew was that I needed a bar! Well, I built the bar, but the dining room still feels like it is missing something. Then BAM! Like lightning! I know EXACTLY what to do!


A KATE SPADE THEMED DINING ROOM

but....
the catch is that I don't want to buy anything designer or extremely expensive. All of my decorations will be found on an extremely tight budget or DIY. Are you excited? Because I am super excited!!


Readers, have you tried to make something designer on a budget? Got any tips?

Image Map

Tuesday, July 1, 2014

DIY Wine Shelf and Bar


I finally live in an apartment where I have room for a bar! AHHHH. So excited you guys. I have been trying to think of what I would want to do, and I finally decided to mimic an idea Jen from IHeart Organizing used (Cutest blog in the world if you ever need to be inspired). She used an IKEA Lack Shelf and some wine glass holders she found on Amazon and created her own wine glass storage! See it here.  Inspired by that, I went to IKEA and bought a shelf. While I was there, I found a lovely wine rack! I was so excited because it would fit perfectly on the shelf.


Then, I tricked my dad into coming and helping me install it. We followed the instructions and drew some very level lines. After that. there was some drilling and such.Before we put the shelf up we made holes for the wine rack using the drill. I was hoping to spray paint it and then put it up later on. However, I did a quick test and noticed that normal wine glasses don't fit on the wine rack. ARGH. So, I ordered these off of Amazon. I bought two and used the original holes my dad created. It makes me so happy now! My apartment is finally coming together. I just used a bookshelf I had found at Nadeau for my "bar" and put the shelf above it. Here is the bar view:


And here is a view of it standing a little farther back. I know I said it before, but isn't it pretty? I just need to order one more wine rack to go in between the two already in there and I think it will be done!


Image Map

Monday, June 16, 2014

DIY KeyChain Holder

Growing up, I always had a table right in front of the door when I entered into the house, and I would put my keys on it. At my old apartment, the kitchen was right next to the door. Now, I have nothing near my door! So I need a keychain holder of some sorts. For my first try, I placed some command hooks on my command center. It was nice, but it was kind of far from the door (I know its only two steps, but thats really far when you are carrying a lot of stuff). 


Then, I started thinking about what I really wanted. I knew I needed something to hold my keys, but I really didn't need it to hold much else because I had the command center right around the corner. I went to Michael's for some inspiration. I found a wooden plaque for about $1.00 and I picked up some gold hooks that are perfect for hanging keys for around $1.50. I knew I had some pretty acrylic paint and a picture frame hanger set at home so nothing else was needed. This meant a grand total of $3.00 for my keychain holder! 

Next thing I had to do was paint and build it!
Here are my supplies:

Acrylic Paint
Wooden Plaque
Hooks (Could use Command Hooks instead)
Blue Painter's Tape
Sawtooth Hanger with nails
Hammer


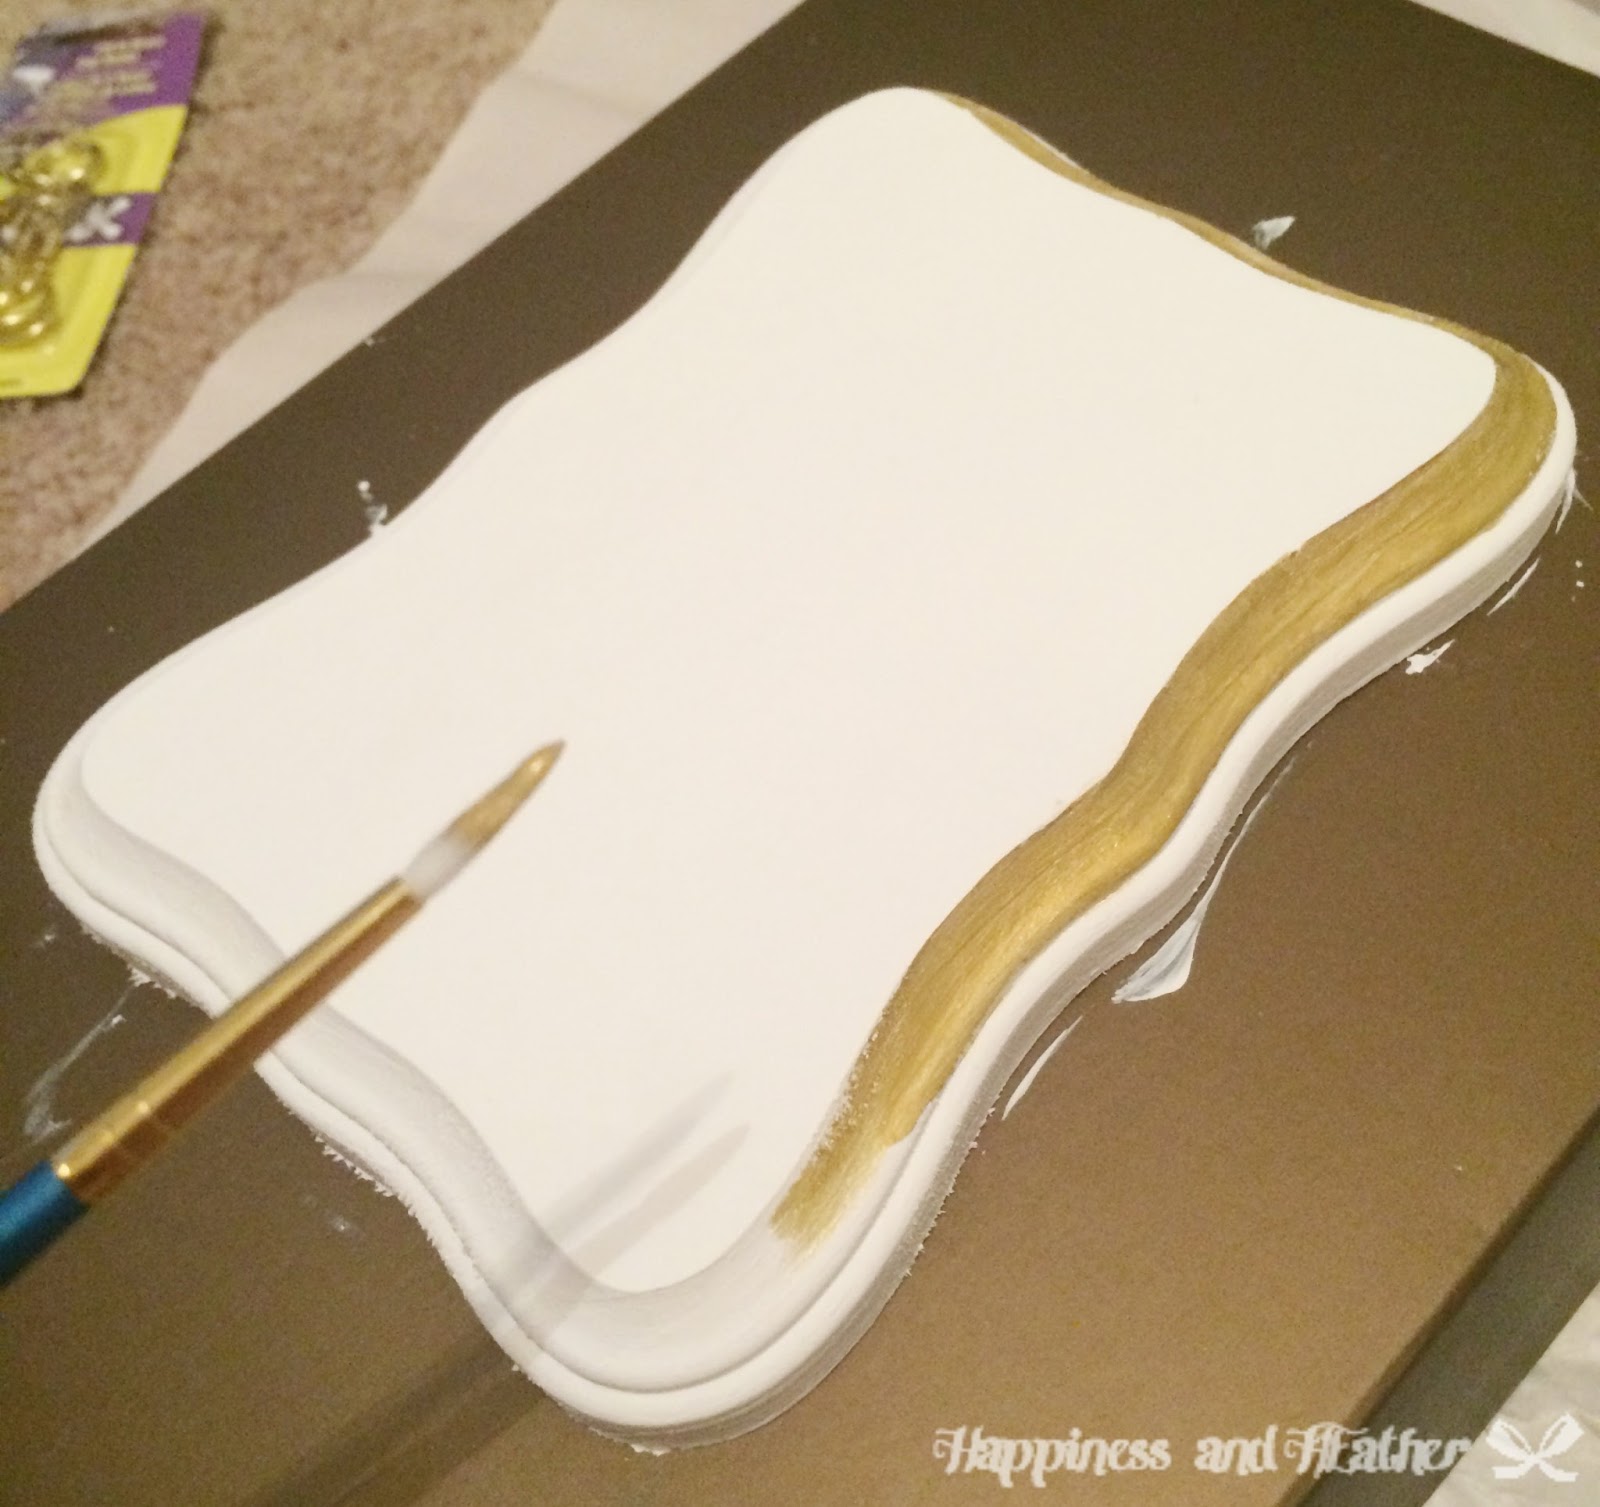
I first began by painting a white base coat. I put two coats down since I wanted white in my pattern. 


Then I painted the border gold. Who doesn't love a little gold?


Then I created the chevron pattern with my blue painters tape. Press down firmly on all edges! I forgot to do that and the paint bled through!


Ewwww paint bleed. I had to clean this up. Not. Fun. 


I attached a Sawtooth Hanger to the back so I could hang it. When I first started hanging stuff, I went to my local Home Depot and bought a picture hanging kit (like the one found here). It is AWESOME. It has all of the basics that I need, including the sawtooth hanger.


Then, I attached the hooks. If you are like me and you need a little help, take a nail and hammer and start a hole. Then, you just screw them in by hand. I chose to do three. Three just sounded like a good number.


All that was left to do was to hang it up! Doesn't it look wonderful?


It is just so girly and perfect. I love it so much and I can't believe I only spent $3 for all of it!


Image Map

Tuesday, June 10, 2014

Decorating Your Clear Organizers

I grew up with this one rule about cleaning "If I can't see it, its clean". And this applies to a lot of things. Can't see dust? Its clean! Can't see the food on a plate? Its clean! (But not sanitized) Can't see whatever you just threw in that drawer? Its clean! I had a big problem in college with clear organizers because I couldn't make them perfect junk drawers. You could see everything you had placed in it and it really bugged me! So I decided to hide everything in my clear, plastic drawers. I found this post on Pinterest, and did what it said. I was able to create these cute plastic drawers! 


I did it with a couple of other plastic drawers in my closet, but the one above is my pride and joy. Once I move to my new place, I think I'm going to apply some labels and clean out the drawers a little better.


Here are the steps to create a cover for your plastic drawers. Sorry there aren't any pictures!

Materials Required:
Scissors
Pencil
ModPodge
Paper (I used cute scrapbook pages)
Paintbrush for the ModPodge

Step 1: Clean out the Plastic Drawers! 
Remove the plastic drawers from the base and vacuum out all of the dust. Make it really clean!

Step 2: Measure out where to cut on the drawers
Just stick the paper in and using a pencil, draw the lines on where to cut. If your drawer is funny shaped, try to cut so it will fit. 

Step 3: Apply ModPodge to the drawer.
Get it nice and thick!

Step 4: Place the paper on top of the glue
Put the bottom of the paper on first and then smooth the paper up to the top of the drawer to get rid of all of the bubbles. 

Step 5: Place another layer of ModPodge on top! 
This will give a good solid cover.

Step 6: Let it dry
Let it dry for a good long time.

Step 7: Place it back into the base
Put it back in and start storing! 

Image Map


You may also be interested in:

Glass Bottle Makeover
Kate Spade-esk Champagne Sign
DIY Key Chain Holder
How To Decorate With Your Graduation Gear

Wednesday, May 28, 2014

Moving 101: Conquer One Room At A Time

*This was imported from my previous blog, Organized Magnolia*

Unpacking is not a fun task (neither is packing), but it is essential to do. I have some advice though. The first thing to do is set up all of the basics. Clean sheets on the bed, food in the pantry, clean clothes to wear for the next day, etc. However, what do you do after that? My advice is to take each room at a time. Try to sort all of your boxes into what rooms they go into (use the colored duct tape method I spoke about here). Then you can unpack one box at a time and it will make your life so much easier.  Make the room your own. Go ahead and decorate it. Make it perfect. Once you are done with one room, you can move on to the next one. Then keep doing that until you're done! Simple right?

Also, I am so sorry that I haven't been around to post! With the moving, working, and altogether craziness that is May, I just haven't been doing anything else! I still have my life in boxes, but my bathroom and kitchen are almost done. I'm hitting the next hurdle of moving, where to hang everything! Hope you guys can stick around for a little longer. I promise I'll be completely back soon.


Image Map
Related Posts Plugin for WordPress, Blogger...