Showing posts with label Organizing. Show all posts

Thursday, August 27, 2015

Decluttering a Jewelry Drawer


When I got back from Europe, I had a ton of empty drawers that I had to refill. So I thought to myself, why not do some organizing? And thats what I did. I re-organized all of my drawers! Mainly, I created a jewelry drawer.


I have absolutely ALWAYS wanted to have one. I've tried other methods such as jewelry hangers, jewelry boxes, and any other method you can possibly think of. None of them really worked out though. I either kept buying the same bracelets and earrings over and over or I would forget I even owned pieces of jewelry. And because of my purge, I now have room in my dresser. I'm so excited! 


The paper was a gift from a family friend of mine when I first moved into an apartment. You could totally use wrapping paper and it would be fine. I picked up the acrylic trays for a $1 at Target (thank you dollar aisles!). I love how bright this is and how I can see everything I own. What do you guys think? 

Have a great day everyone!


Wednesday, April 1, 2015

Binder of Manuals


Do you have so many manuals that you don't know what to do with them all? Are they just thrown in random corners of your house or thrown away? Well, I have a solution for you!!!


Wow that sounds like a info commercial, but this is a really good idea that you should start doing. First, go find a really big binder that you like and buy some transparent sleeves. Or you could buy folders that can go in a three ring binder. Those work too.


Then you just start filling the binder with all of those manuals and random pieces of paper you needed to keep about furniture, electronics, etc. I love this idea because now I know where all of my random little manuals are and any scrap of paper that I need to keep that has important information. I also used Post-Its to write on the outside of the sleeve to tell me what it is.


As part of my command center, I also have a butterfly clip marked as 'File Me'. Then, I can store it in my command center until I have a chance to file it. Its so nice and makes my life a lot more organized!


Happy Organizing Everyone!

Image Map


You may also be interested in:

Glass Bottle Makeover
Kate Spade-esk Champagne Sign
DIY Key Chain Holder
How To Decorate With Your Graduation Gear

Monday, June 16, 2014

DIY KeyChain Holder

Growing up, I always had a table right in front of the door when I entered into the house, and I would put my keys on it. At my old apartment, the kitchen was right next to the door. Now, I have nothing near my door! So I need a keychain holder of some sorts. For my first try, I placed some command hooks on my command center. It was nice, but it was kind of far from the door (I know its only two steps, but thats really far when you are carrying a lot of stuff). 


Then, I started thinking about what I really wanted. I knew I needed something to hold my keys, but I really didn't need it to hold much else because I had the command center right around the corner. I went to Michael's for some inspiration. I found a wooden plaque for about $1.00 and I picked up some gold hooks that are perfect for hanging keys for around $1.50. I knew I had some pretty acrylic paint and a picture frame hanger set at home so nothing else was needed. This meant a grand total of $3.00 for my keychain holder! 

Next thing I had to do was paint and build it!
Here are my supplies:

Acrylic Paint
Wooden Plaque
Hooks (Could use Command Hooks instead)
Blue Painter's Tape
Sawtooth Hanger with nails
Hammer


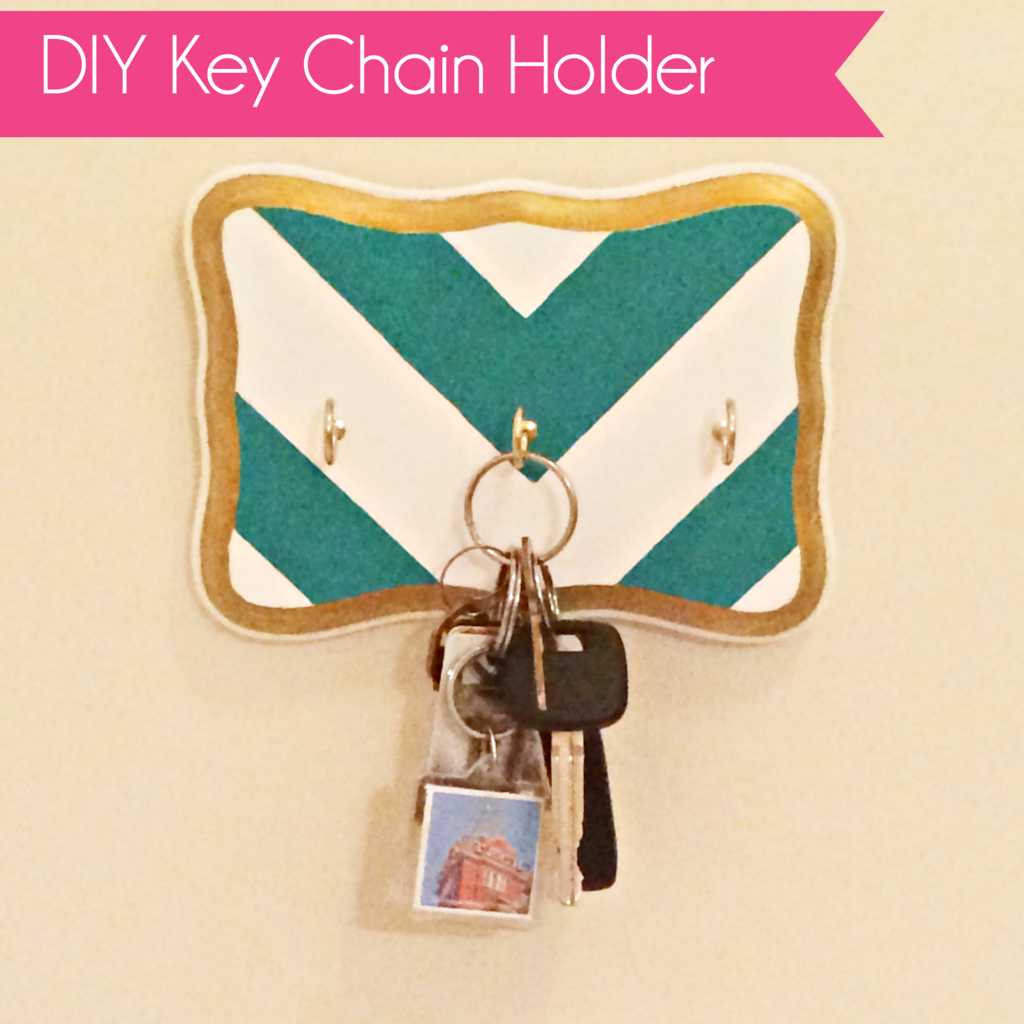
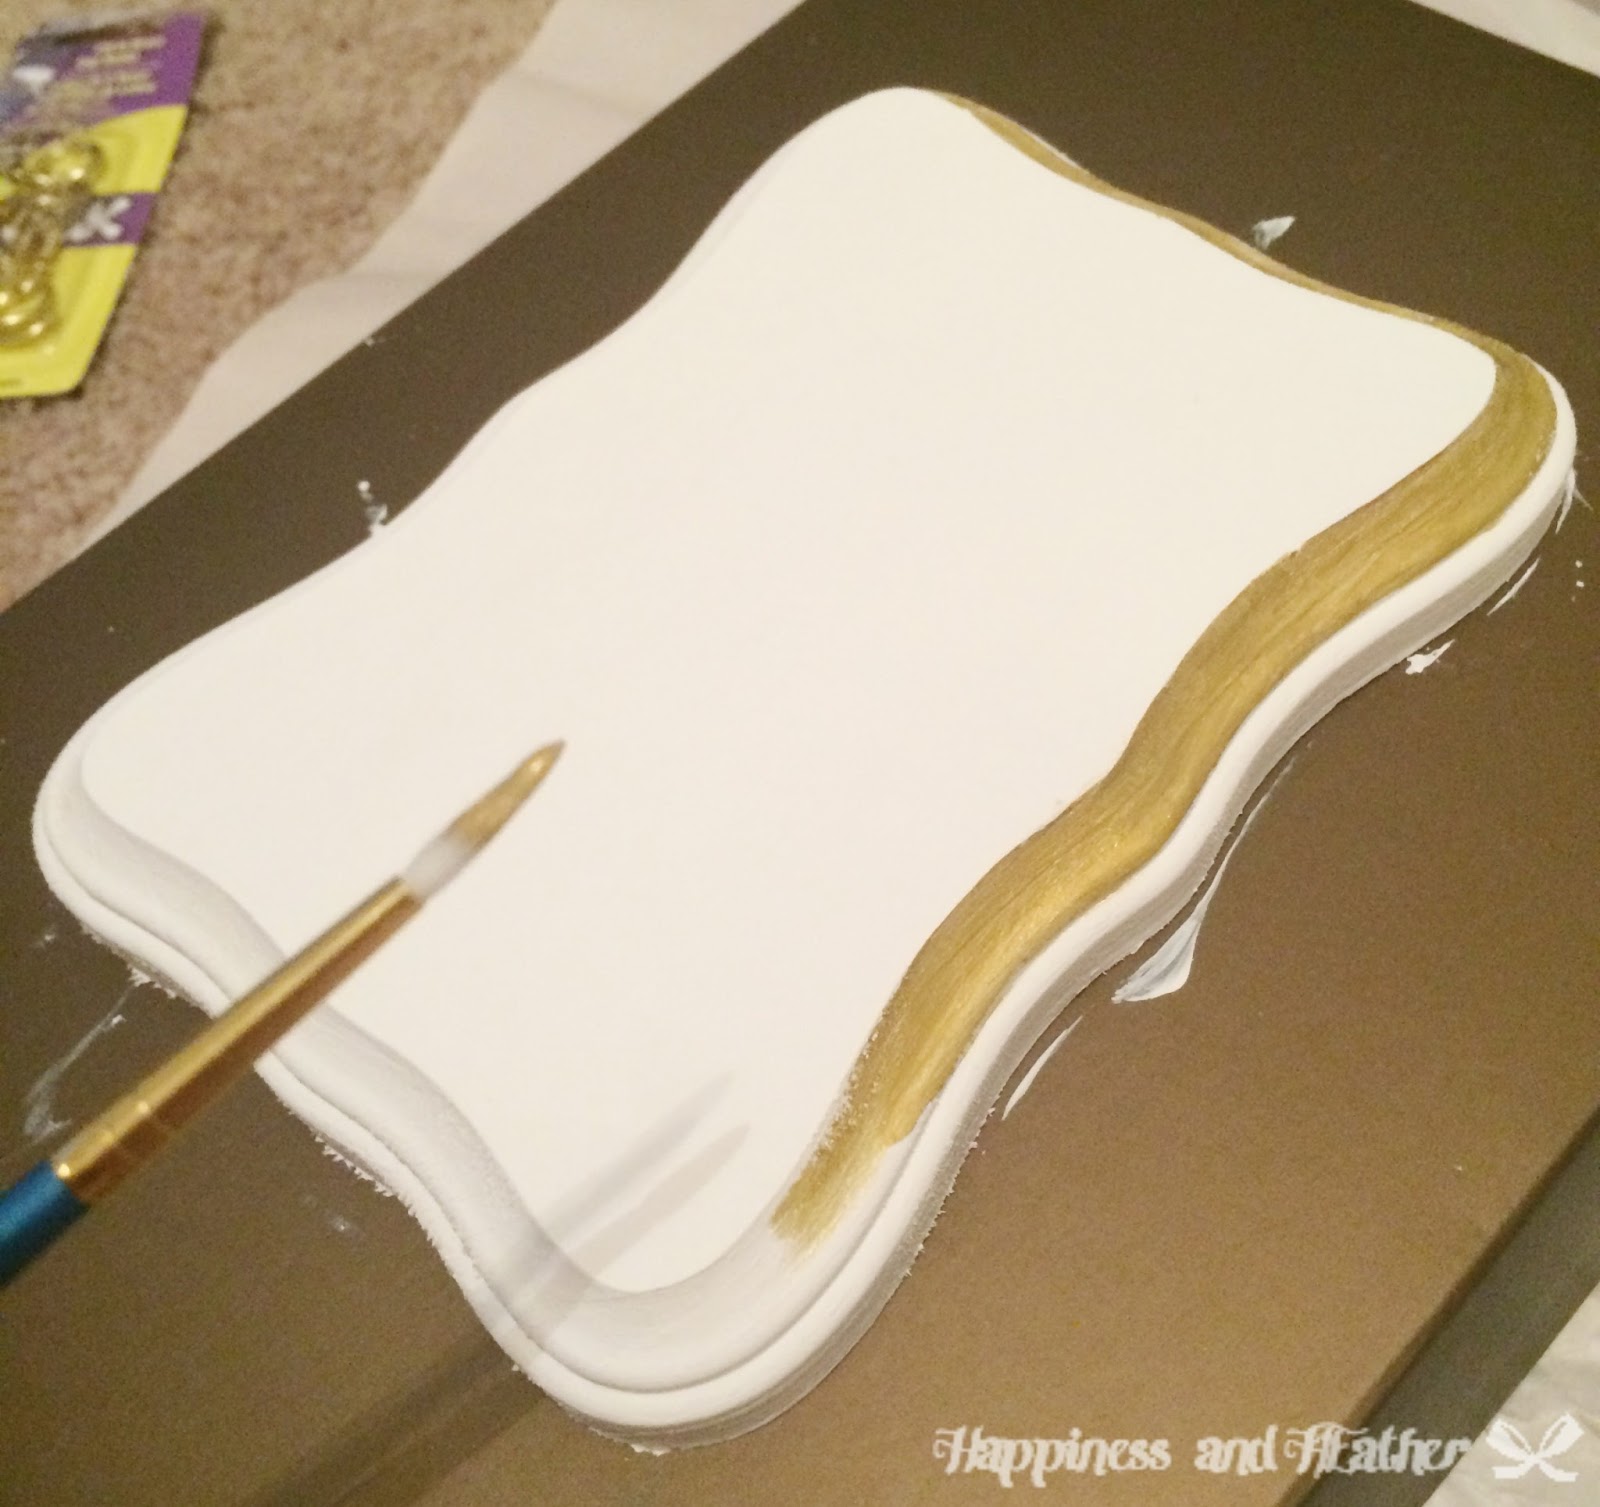
I first began by painting a white base coat. I put two coats down since I wanted white in my pattern. 


Then I painted the border gold. Who doesn't love a little gold?


Then I created the chevron pattern with my blue painters tape. Press down firmly on all edges! I forgot to do that and the paint bled through!


Ewwww paint bleed. I had to clean this up. Not. Fun. 


I attached a Sawtooth Hanger to the back so I could hang it. When I first started hanging stuff, I went to my local Home Depot and bought a picture hanging kit (like the one found here). It is AWESOME. It has all of the basics that I need, including the sawtooth hanger.


Then, I attached the hooks. If you are like me and you need a little help, take a nail and hammer and start a hole. Then, you just screw them in by hand. I chose to do three. Three just sounded like a good number.


All that was left to do was to hang it up! Doesn't it look wonderful?


It is just so girly and perfect. I love it so much and I can't believe I only spent $3 for all of it!


Image Map

Tuesday, June 10, 2014

Decorating Your Clear Organizers

I grew up with this one rule about cleaning "If I can't see it, its clean". And this applies to a lot of things. Can't see dust? Its clean! Can't see the food on a plate? Its clean! (But not sanitized) Can't see whatever you just threw in that drawer? Its clean! I had a big problem in college with clear organizers because I couldn't make them perfect junk drawers. You could see everything you had placed in it and it really bugged me! So I decided to hide everything in my clear, plastic drawers. I found this post on Pinterest, and did what it said. I was able to create these cute plastic drawers! 


I did it with a couple of other plastic drawers in my closet, but the one above is my pride and joy. Once I move to my new place, I think I'm going to apply some labels and clean out the drawers a little better.


Here are the steps to create a cover for your plastic drawers. Sorry there aren't any pictures!

Materials Required:
Scissors
Pencil
ModPodge
Paper (I used cute scrapbook pages)
Paintbrush for the ModPodge

Step 1: Clean out the Plastic Drawers! 
Remove the plastic drawers from the base and vacuum out all of the dust. Make it really clean!

Step 2: Measure out where to cut on the drawers
Just stick the paper in and using a pencil, draw the lines on where to cut. If your drawer is funny shaped, try to cut so it will fit. 

Step 3: Apply ModPodge to the drawer.
Get it nice and thick!

Step 4: Place the paper on top of the glue
Put the bottom of the paper on first and then smooth the paper up to the top of the drawer to get rid of all of the bubbles. 

Step 5: Place another layer of ModPodge on top! 
This will give a good solid cover.

Step 6: Let it dry
Let it dry for a good long time.

Step 7: Place it back into the base
Put it back in and start storing! 

Image Map


You may also be interested in:

Glass Bottle Makeover
Kate Spade-esk Champagne Sign
DIY Key Chain Holder
How To Decorate With Your Graduation Gear

Wednesday, May 28, 2014

Moving 101: Conquer One Room At A Time

*This was imported from my previous blog, Organized Magnolia*

Unpacking is not a fun task (neither is packing), but it is essential to do. I have some advice though. The first thing to do is set up all of the basics. Clean sheets on the bed, food in the pantry, clean clothes to wear for the next day, etc. However, what do you do after that? My advice is to take each room at a time. Try to sort all of your boxes into what rooms they go into (use the colored duct tape method I spoke about here). Then you can unpack one box at a time and it will make your life so much easier.  Make the room your own. Go ahead and decorate it. Make it perfect. Once you are done with one room, you can move on to the next one. Then keep doing that until you're done! Simple right?

Also, I am so sorry that I haven't been around to post! With the moving, working, and altogether craziness that is May, I just haven't been doing anything else! I still have my life in boxes, but my bathroom and kitchen are almost done. I'm hitting the next hurdle of moving, where to hang everything! Hope you guys can stick around for a little longer. I promise I'll be completely back soon.


Image Map

Monday, April 7, 2014

Cleaning 101: Pinterest Boards

In the spirit of Spring Cleaning, I have decided to clean up my Pinterest boards. I have thankfully been able to organize my blog one really well, but my personal one? Not so much.


I have so many boards already! Most of my boards have over 300 pins. I need to do a bit of cleaning. Because what if I'm looking for that one particular pin in all of my boards?


You can see here that my generic beauty one is 581 pins! How in the world will I ever be able to find that one pin I'm looking for? Well here is my solution.

First, see what you already have available. I have a lot, and so I'm going to do it like paying off credit card debt. Start with the boards that need to be edited. List them in order of the lowest number of pins first. The boards of mine that need to be edited in order are:

DIY - 294 Pins
Craft Ideas - 350 Pins
Entrees - 364 Pins
Apartments - 373 Pins
Clothes - 387 Pins
Get Skinny - 578 Pins
Beauty - 581 Pins
For the Home - 621 Pins

So I start with DIY. 

I have a wide range of things in my DIY board, but from what I can tell, they break down into a couple of categories. Mainly, cleaning, helpful tips, how tos, beauty, and a basic, catch-all DIY. So I created new boards for DIY with subcategories. 


Then, here is the hardest part of all. Go to each pin, click edit, and change the board it is stored under. Unfortunately, Pinterest doesn't let you move multiple pins at once. 

During this time, filter out the pins that no longer apply anymore and if the link is broken (a random click on a link every now and then will do). Why do you want to keep it if it a) doesn't matter anymore or b) the link doesn't even work? Don't forget to put the pins back in their proper boards!

Once you are done, start on the next board. 


Image Map
Related Posts Plugin for WordPress, Blogger...